You’ve seen them on literally every product you’ve ever bought, but barcodes aren’t just for checkout lines and warehouses anymore. A barcode inventory system is simply a way to digitally track your physical items using scannable codes, and it’s become an incredibly powerful tool for organizing your home.
Think of it as giving everything you own a digital fingerprint. This method automates the tedious parts of tracking your stuff and gives you a real-time, accurate picture of what you have and where it is.
Why Barcodes Are No Longer Just for Warehouses
Imagine knowing exactly which box in the attic holds the holiday decorations or finding that one specific power tool in a jam-packed garage in under ten seconds. That’s the kind of control we’re talking about. What was once a complex, expensive system for massive businesses is now a surprisingly simple solution for home organization.
A personal barcode inventory system brings that professional-level efficiency right into your living space. It’s a direct answer to common frustrations.
It completely eliminates the wasted time you spend searching for misplaced items. It stops you from buying duplicates of things you know you own but just can't find. And instead of digging through a junk drawer for a user manual or warranty, you can attach that information digitally to an item’s barcode. Everything you need to know is right there on your phone.
The Evolution of Inventory Tracking
Using codes to track things isn't some new-age concept; it has deep roots in the commercial world. The barcode revolution really kicked off in the 1960s when retailers were desperate for something faster and more reliable than the clunky punch card systems they were stuck with.
The real turning point came in 1974 with the standardization of the Universal Product Code (UPC). Fun fact: a pack of Wrigley's Chewing Gum was the very first item scanned in a supermarket, proving the system was ready for the big time. This meant employees no longer had to memorize prices or product details, since it was all stored in the code. That single scan paved the way for the sophisticated inventory software we have today.
Making Professional Organization Simple
The best part? You don’t need a warehouse or a bulky scanner gun to get all the benefits. Modern apps like Vorby put this powerful organization right in your pocket. With features like AI-powered image recognition and automatic receipt parsing, what sounds like a massive undertaking becomes a manageable (and honestly, pretty satisfying) weekend project.
A well-organized home inventory does more than just save time; it reduces stress and gives you a clear picture of what you own, empowering you to make better decisions about purchases and space.
The core idea is beautifully simple:
- Assign a unique code: Give every box, storage bin, or important item its own scannable QR code.
- Build a digital catalog: Scan the code with your phone and add photos, descriptions, locations, and important documents like warranties or manuals.
- Find anything fast: When you need something, just search for it in the app to see its exact location.
By bringing this technology from a business setting into your home, you gain an incredible amount of control over your environment. If you want to dive deeper, you can explore exactly how a QR code inventory system works to get more ideas for your own setup. The result is a home that runs more smoothly, with less clutter and a whole lot more clarity.
Designing Your Home Inventory Blueprint
A successful home inventory system starts with a solid plan, not just a pile of labels. Before you print a single code, taking some time to design a blueprint will save you a ton of headaches later. Think of it as the foundational step that ensures the system you build actually works for you and your lifestyle.
The first big decision is defining your scope. It’s incredibly tempting to try and catalog your entire house at once, but I've seen that approach lead to burnout more times than I can count. A much smarter strategy is to start small. Just pick one area where you feel the most organizational pain, like a cluttered garage, a chaotic pantry, or that storage closet filled with mystery boxes.
By focusing on a single, high-impact zone, you get a quick win. This gives you immediate relief and, more importantly, the motivation to keep going. Once you've perfected your process in one room, you can confidently expand the system to the rest of the house.
Define Your Categories
With your starting point decided, the next step is to think about how you want to categorize your belongings. A logical structure is the backbone of any searchable inventory. There are no strict rules here; the best system is the one that makes intuitive sense to you and your family.
Here are a few common methods I've seen work well:
- By Room: This is the most straightforward approach. You create top-level categories like 'Garage,' 'Kitchen,' 'Attic,' and 'Basement.' It’s simple and works great when you know an item's general location.
- By Item Type: Grouping similar items together is also incredibly effective. You could have categories like 'Electronics,' 'Camping Gear,' 'Holiday Decorations,' or 'Important Documents.' This is a lifesaver when you remember what an item is but have no clue where you put it.
- By Owner: In a family or shared living situation, categorizing by owner can prevent a lot of confusion. Think 'Dad’s Tools,' 'Kids’ Toys,' or 'Shared Kitchen Supplies' to clarify who owns what.
You can even combine these methods. For example, you might have a main category for 'Garage' with subcategories inside for 'Gardening Tools' and 'Car Maintenance.' The real goal is to create a structure that mirrors how you naturally think about your stuff.
This decision tree shows how tracking items can directly solve common household frustrations, like wasting time hunting for something or buying duplicates.
![]()
Ultimately, the flowchart highlights that what you track should be guided by why you're tracking it, connecting your organizational efforts to real, tangible benefits.
Choose Your Tagging Technology
The final piece of your blueprint is picking the right tagging technology. For a home system, your two main choices are QR codes and NFC (Near Field Communication) tags. While both link a physical item to a digital record, they have different strengths that make them better for certain jobs.
Deciding between them can feel technical, but it really comes down to how you plan to use them. Here’s a quick breakdown to help you choose.
Choosing Your Tagging Method: QR Codes vs. NFC Tags
| Feature | QR Codes | NFC Tags |
|---|---|---|
| Best For | Visible items, storage bins, boxes, large equipment, file folders. Anything you can easily see. | Discreet items, inside cabinets, on valuable electronics, under shelves, or on items you want to look clean. |
| How It Works | Scan with your phone's camera from a distance. Line of sight is required. | Tap your phone directly on the tag. Requires physical contact or very close proximity. |
| Cost | Very low-cost. You can print them yourself on standard sticker paper with any home printer. | Higher initial cost. You need to purchase the physical tags, which are small adhesive chips. |
| Durability | Can be damaged by water, dirt, or tearing unless you use durable, waterproof labels. | Extremely durable. Often encased in plastic or resin, making them waterproof and resistant to wear. |
| Appearance | Visually obvious. The black-and-white square pattern is a clear marker. | Nearly invisible. Small, thin discs that can be hidden inside or on the back of items. |
| Convenience | Great for scanning multiple items in a storage area quickly. No need to touch each one. | Perfect for a quick, elegant tap-to-scan action without needing to open your camera app first. |
You don't have to choose just one, though. A hybrid approach often works best. Use QR codes for those big storage bins in the attic and a discreet NFC tag inside your kitchen spice drawer for a cleaner, more elegant solution. By leveraging the strengths of both technologies, you can build a system that's perfectly suited to every corner of your home.
Getting Your Barcode Labels Made and Placed
Alright, your organizational blueprint is done. Now it's time for the fun part: bringing your digital inventory into the physical world. This is where you'll generate and stick on the codes that act as digital keys to everything you want to track. It sounds technical, but it’s actually incredibly simple, especially with modern apps like Vorby that have code generators built right in.
The whole point is to create a unique identifier for each item or container. The code itself doesn't hold any data; its only job is to be a one-of-a-kind link. When you scan it, the app pulls up all the rich info you've stored, like photos, purchase dates, warranty info, or attached manuals.
This simple connection is the heart of a great barcode system. It keeps the physical label clean and easy to scan, while all the important details live safely in your digital catalog, ready whenever you need them.
Generating Your First Batch of Codes
Making your codes is a breeze. Using an inventory app, you can whip up a batch of unique QR codes in just a few taps, which are usually exported as a PDF ready for printing. While you could just use a standard printer and some paper, the durability of your labels is what makes or breaks the system long-term.
Trust me, a label that smudges, fades, or peels off is just a broken link in your inventory chain. Investing in the right label material from the get-go will save you a ton of frustration down the road. This guide to choosing the right sticker or label is a fantastic resource for figuring out the best material and adhesive for what you're tracking.
Think about where your stuff lives and pick labels to match:
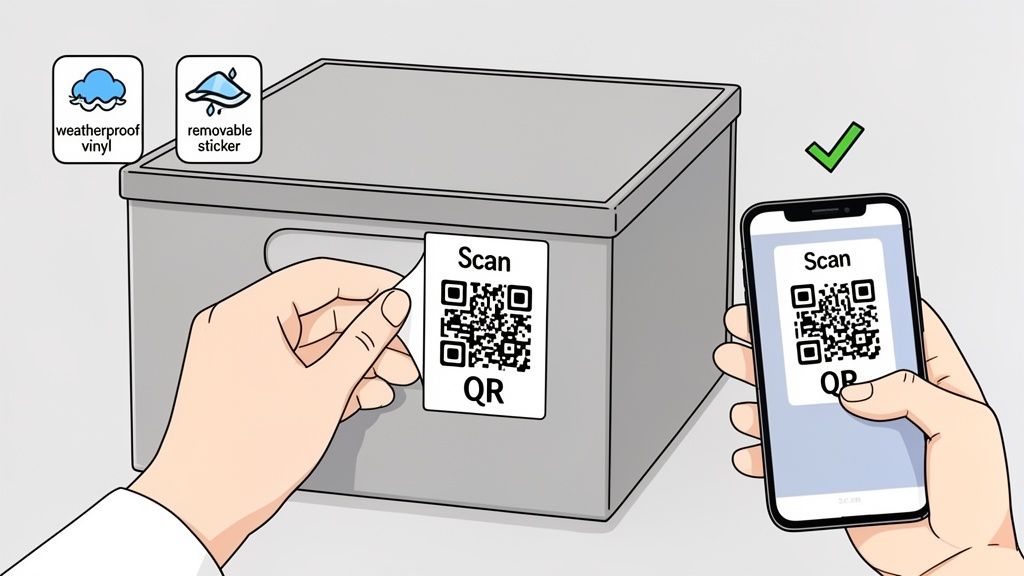
- Garage or Attic Storage: These spots deal with wild temperature swings and moisture. Go for weatherproof vinyl labels. They stand up to water, UV light, and tearing, ensuring they'll stay scannable for years.
- Kitchen or Pantry Items: Clear, removable labels are perfect for containers you might reuse, like spice jars or pantry canisters. They stick firmly but peel off clean without leaving that annoying sticky gunk behind.
- Temporary Storage: If you're just organizing for a move or a short-term project, basic adhesive paper labels are totally fine. They’re cheap and easy to swap out.
Key Takeaway: The quality of your label is just as important as the code on it. A durable, well-placed label is the secret to a reliable system, preventing the headache of unscannable codes that mess up your whole organization.
Best Practices for Applying Labels
Once you have your labels printed, where and how you stick them makes all the difference in how easy your system is to use. The goal is to make scanning a quick, thoughtless action, not a frustrating treasure hunt.
First, consistency is king. Decide on a standard spot for similar items. For example, always stick the label on the top-right corner of your storage bins. This builds muscle memory, so you’ll automatically know where to point your phone without even thinking about it. For individual items, find a spot that’s easy to see but not in the way, like the back of an electronic device or the underside of a shelf.
Next, stick to flat surfaces. QR codes need to be read on a flat plane. Slapping a label over a sharp curve, a corner, or a rough, bumpy surface can distort the code and make it unreadable. If you absolutely have to label a round object, orient the code so it runs along the length of the cylinder to keep it as flat as possible.
Finally, think about access. Place labels where you can scan them without having to move a mountain of boxes or unpack a whole shelf. For bins stacked on top of each other, this means putting the label on the side that faces out. For more in-depth strategies, our guide on the best way to label storage bins has a ton of practical tips.
By following these simple rules, you’ll make sure every scan is fast and reliable, turning the daily use of your inventory system into a seamless, almost invisible, habit.
Bringing Your Digital Catalog to Life with Smart Tools
A barcode is just a key. The real magic happens when that key unlocks a rich, detailed record of everything you own. Now that you’ve got your labels ready, it's time to build out your digital catalog and turn a simple code into a comprehensive, intelligent home inventory.
The basic workflow couldn't be simpler: you scan a new QR code with your phone, which pops open a blank entry in your inventory app. Then, you start filling in the details. The great news is that modern tools can automate a huge chunk of this process, saving you a massive amount of time and effort.

This step-by-step process of adding details creates a powerful, searchable database that makes finding and managing your stuff incredibly efficient.
Let Image Recognition Do the Heavy Lifting
Manually typing descriptions for dozens, or hundreds, of items is a real drag. This is where AI-powered image recognition becomes a total game-changer. Instead of painstakingly typing "Sony WH-1000XM4 Wireless Headphones, Black," you can just snap a photo.
The software analyzes the image, identifies the product, and automatically fills in the name, brand, and sometimes even the model number for you. This works especially well for common consumer goods like electronics, tools, and appliances. It radically speeds up the initial cataloging, turning a chore that could take hours into a task you can knock out in minutes.
The accuracy of these systems has gotten ridiculously good, often nailing specific product variations with surprising precision. It’s a perfect example of smart tech handling the grunt work so you can focus on getting organized.
Capture Purchase Details Instantly with Receipt Parsing
Keeping track of purchase details is non-negotiable for insurance claims, returns, and warranty management. But who wants to dig through old emails or a shoebox of paper receipts? Modern inventory apps like Vorby have a brilliant solution: email receipt parsing.
This feature lets you forward your digital receipts (from Amazon, Best Buy, Home Depot, you name it) directly to your inventory app. The system automatically scans the email, pulls out all the key information, and creates a new inventory entry.
It grabs all the crucial data points:
- Item Name: The exact product you bought.
- Purchase Price: Vital for insurance records.
- Purchase Date: The day the warranty clock starts ticking.
- Retailer Information: Where you got it from.
This automated workflow ensures your inventory stays current with new purchases, requiring almost zero manual entry. It closes the loop between buying something and logging it in your system. If you want to dive deeper, check out our guide on inventory software with barcode support.
Create a Central Hub for All Your Digital Documents
One of the most valuable moves you can make is attaching related files directly to an item's entry. This creates a single source of truth for everything you own, eliminating the frantic search through file cabinets or cluttered desktop folders forever.
Think about it. You need the manual for your dishwasher. Instead of Googling the model number or digging through that "junk drawer," you just scan the QR code you stuck on the appliance. Boom, the PDF manual is right there on your phone.
By linking digital documents directly to physical items, you transform your inventory from a simple list into a comprehensive resource center. This simple habit saves countless hours of searching over the long term.
Get in the habit of attaching these types of files to your items:
- User Manuals: For appliances, electronics, and tools.
- Warranty Documents: Proof of coverage and claim instructions.
- Assembly Instructions: For furniture and anything else that came in a flatpack box.
- Digital Receipts: A permanent backup for returns or insurance claims.
- Photos of the Item: Documenting its condition, especially for high-value belongings.
This practice isn't just about convenience; it adds serious value to your barcode inventory management system. It ensures every piece of information you could ever need about an item is just a quick scan away.
Why This System Is Built to Last
The principles behind this aren't new; they’re built on technology that has proven its reliability for decades. Barcodes are an indispensable part of the global economy. Over 50 years after their introduction, barcodes are scanned more than 10 billion times every single day worldwide. Over two million organizations across retail, healthcare, and logistics depend on them.
What’s so great is that the same efficiency and accuracy trusted by global corporations are now accessible to anyone with a smartphone. By building a rich digital catalog, you’re applying a time-tested professional strategy to your own home, ensuring your system is a robust, long-term solution, not just a passing novelty.
Keeping Your Home Inventory System Accurate
Let's be honest: a home inventory system is a powerful tool, but its real value comes down to one thing: accuracy. If your app says you have three rolls of paper towels but the closet is empty, the system is just digital clutter. The real secret to making this work long-term isn't spending hours auditing your stuff. It's about building simple, repeatable habits that fold right into your daily life.
The goal is to make updates feel as natural as putting away groceries. With a few smart workflows, keeping your digital catalog in sync with your physical world becomes a background task that only takes a few minutes here and there.
Establishing Simple Daily Workflows
The most common updates you'll ever make are adding, moving, or using up items. The easiest way to stay on top of this is to create a simple "if this, then that" mental checklist for these moments.
Here’s how that plays out in the real world:
- After a Shopping Trip: As you unpack new tools, electronics, or bulk pantry goods, just take an extra 30 seconds per item. Snap a photo, let the image recognition do its thing, scan the receipt for the purchase details, and assign it to a location. Done.
- Moving an Item: Shifting the camping gear from the garage to the basement closet for the winter? Just scan the box's QR code, tap "update location," and pick its new home. That one simple scan prevents the classic "where on earth did I put that?" headache later.
- Using or Discarding Something: When you finish a container of protein powder or donate a box of old clothes, give the code one last scan and mark the item as "consumed" or "removed." This keeps your stock levels accurate and stops you from thinking you have something you don't.
Collaborating with Shared Inventories
In a house with more than one person, an inventory system can fall apart fast if only one person is in charge. This is where a shared account becomes a total game-changer. A solid system like Vorby lets you invite family members or roommates to a shared space.
This team approach spreads the small bits of work around and, frankly, makes the system way more useful for everyone. You can even set permissions, so maybe everyone can view the inventory, but only certain people can add or delete things. That way, when your partner uses the last of the printer paper from the office closet, they can update the system right from their own phone.
A shared inventory turns "Where did you put the...?" into a quick app search. It builds a sense of shared ownership over your home's organization and ensures the system remains a reliable single source of truth for everyone.
Troubleshooting Common Scanning Issues
Even with the best setup, you’ll eventually hit a snag, like a label that refuses to scan or a damaged code. Don't sweat it. These issues are almost always simple to fix and don't mean you have to start from scratch.
Here’s how to handle the most common headaches:
- Damaged or Unscannable Label: If a QR code gets smudged, torn, or faded over time, the fix is easy. Just look up the item manually in your app, generate a new code for it, print it on a fresh label, and stick it over the old one.
- Poor Lighting or Glare: Sometimes the scanner just can't get a good read in dim light or when a glossy label reflects an overhead light. Try moving the item somewhere brighter or just use your hand to shield the label from the glare before scanning again.
- Item Not Found: If a scan comes up with "item not found," it usually just means the link between that physical tag and its digital entry got broken somehow. No big deal. Simply re-assign the existing QR code to the correct item in your app to relink them.
These small maintenance habits are what separate a short-lived project from a truly functional barcode inventory management system. While a home setup doesn't need the same brutal efficiency as a commercial warehouse, the core ideas of accuracy and consistency are just as important. Businesses see massive returns from this kind of precision. In one case, a mid-sized retailer got a full return on their system investment in just nine months, slashing labor costs by 35% and nearly wiping out shipping errors. You can read more about how barcode systems deliver financial returns and find other metrics that prove how effective they are.
A Few Common Questions About Home Barcode Systems
Diving into a home inventory project can feel a little daunting. Most people get stuck on the "how," but the questions that pop up are usually way more intimidating than the actual work.
Let's clear the air and tackle some of the most common concerns, from the time commitment to the tools you'll actually need to get this done. You'll see it’s less about being a tech wizard and more about having a smart plan.
How Long Does This Actually Take to Set Up?
Honestly, it all comes down to how big you want to go. If you’re just trying to tame a single chaotic space, like your pantry or that disaster of a workbench in the garage, you can get it fully cataloged and labeled in a few hours on a Saturday. Seeing that instant, tangible result is a huge motivator.
Now, tackling an entire house is a different beast. Don't try to do it all at once. Treat it like a marathon, not a sprint. A great approach is to dedicate an hour or two each weekend for a month. Once that initial push is over, the daily upkeep is tiny, often just a few minutes to log a new purchase or update an item’s location.
The real secret here is to start small. Pick the one room or closet that causes you the most stress and perfect your system there. This builds momentum and makes the bigger project feel way less overwhelming.
What Tools Do I Genuinely Need to Start?
You need surprisingly little to build a powerful home inventory system. Forget about buying expensive, specialized hardware. The most critical pieces are probably already in your pocket or on your desk.
Here’s the complete, no-fluff list of what you need:
- A Smartphone: The camera on your phone is your scanner. Seriously, that's it. No need for a dedicated barcode reader.
- An Inventory App: This is the digital brain of your operation. A platform like Vorby is built to generate your codes and, more importantly, store all the rich data connected to them.
- Labels: You can kick things off with basic adhesive label sheets and your standard home printer. For tougher environments like a garage or basement, it’s worth upgrading to waterproof vinyl labels for durability.
That’s it. Those three simple tools are all it takes to build a fully functional system that rivals what the pros use.
Can't I Just Use the Barcodes Already on Products?
While you can scan the existing UPC barcode on a product, it's a flawed strategy for managing your personal stuff. A manufacturer's barcode only identifies a product type, like "Brand X 15oz Canned Corn." It knows nothing about your specific can of corn.
That’s why creating your own QR codes is a much smarter move. Sure, some warehouses use 1D barcodes like Code 128 because they handle letters and numbers well, but QR codes are vastly superior for home inventory.
Why? A standard 1D barcode holds about 20-25 characters. A QR code, on the other hand, can store over 2,500 numeric characters. That massive difference in capacity is what makes them so powerful for a personal system.
By generating your own unique QR code, you're not just identifying an item; you're creating a direct link to a rich digital record that you control. This is where you can track the purchase date, log the expiration date, note its exact location in your pantry, attach warranty info, and even upload a photo of the receipt. Your custom code turns a physical object into a searchable, personal database entry, and that’s far more useful for managing your home.
Ready to stop searching and start finding? Vorby gives you the AI-powered tools to create a seamless home inventory system. See exactly what you own and find anything in seconds. Start your free trial today at https://vorby.com.