Think of your storage unit as an off-site closet, not a dumping ground for forgotten belongings. The moment you start treating it like a strategic extension of your home, everything changes. It’s not just about cramming boxes in; it’s about creating a smart layout with clear aisles, using the right containers, and, most importantly, knowing exactly what you own and where to find it.
This approach is what turns a chaotic, money-pit of a space into a functional, easily accessible asset.
Why Smart Storage Organization Is a Game Changer
Let's be honest, renting a storage unit is usually a quick fix for a clutter problem. But without a real strategy, that quick fix can quickly spiral into an expensive, disorganized black hole. So many people fall into the trap of just piling boxes to the ceiling, only to waste hours, or even days, digging for one specific item later. This is where a little forethought makes all the difference.
The key is a simple mental shift. Stop seeing your unit as a place to forget things and start seeing it as valuable, usable space. That change in perspective is the first step toward building an efficient system that genuinely saves you time, money, and a whole lot of stress. When your unit is organized, you can find what you need in minutes, not hours, and you’re actually getting your money's worth out of every square foot.
The Hidden Costs of a Messy Unit
Disorganization has real, tangible consequences. Beyond the monthly rent, a chaotic unit costs you in ways you might not even realize. Honing the skills for how to organize small spaces at home is the perfect training ground for your storage unit, helping you dodge common headaches like:
- Wasted Time: The frantic, sweat-inducing search for holiday decorations or important paperwork when you need it now.
- Damaged Belongings: Items getting crushed, broken, or warped from being improperly stacked and stored.
- Duplicate Purchases: The classic "I'll just buy another one" move because you can't find the one you already own buried in a mountain of boxes.
- Unused Space: Paying for a 10x15 unit when a 10x10 would do, all because poor stacking is eating up your vertical and horizontal space.
A disorganized unit doesn't just hide your belongings; it hides their value. By investing a little time upfront in planning, you protect your possessions and your peace of mind.
To truly transform a chaotic storage space into an efficient, accessible asset, it helps to keep a few core principles in mind. These are the foundational ideas that separate a functional unit from a frustrating one.
| Principle | Actionable Tip | Why It Works |
|---|---|---|
| Accessibility First | Plan for clear aisles and place frequently needed items near the front. | Prevents you from having to empty half the unit just to grab one box. |
| Stack Smart, Not High | Use uniform, sturdy boxes and create stable, logical stacks. Avoid piling mismatched containers. | Reduces the risk of crushing, protects your belongings, and maximizes vertical space safely. |
| Visibility is Key | Use clear bins when possible and create a detailed digital inventory with photos. | You know what's in every box without having to open a single one, saving immense time and effort. |
| Think Like a Librarian | Every item has a designated "home." Group similar items together and map your layout. | Creates a predictable system, making retrieval intuitive and preventing items from getting lost. |
These aren't just tips; they're a mindset. Adopting them means you're no longer just storing stuff, you're managing an asset.
A Modern Approach to Storage
Today, getting your storage unit in order goes way beyond just physical placement. The best strategies blend practical, time-tested techniques with powerful digital tools to create a space that’s perfectly cataloged. Imagine knowing exactly what’s in every single box without ever having to lift the lid. For more on this, check out our guide on the benefits of an efficient storage of inventory system.
Industry surveys show that poor organization can waste up to 30% of your time when you’re just trying to find something you own. This is where a tool like Vorby really changes the game, using features like image recognition and QR codes to catalog your belongings almost instantly.
The data backs this up. Self-storage facilities have seen same-store occupancies hit 93.2%, with tenants staying for an average of 3.5 years, largely because a better, more organized experience leads to long-term satisfaction. It proves that when you give people the tools to manage their space effectively, they stick around.
Developing Your Storage Unit Blueprint
A truly organized storage unit doesn't start with the first box you load. It starts with a plan. Just jumping in and packing is like starting a road trip without a map; sure, you might get there eventually, but the journey will be frustrating and wildly inefficient. A good blueprint is the critical first step that determines how well the space will actually work for you, whether it's for a few months or several years.
This whole planning phase is about being intentional. Instead of just reacting to a growing pile of belongings, you’re proactively deciding where everything is going to live. This little bit of foresight is what prevents the all-too-common headache of having to empty half your unit just to find that one specific thing you need.
The modern approach to storage is a simple, smart loop: you catalog your items digitally, organize them physically, and then access them effortlessly when needed.
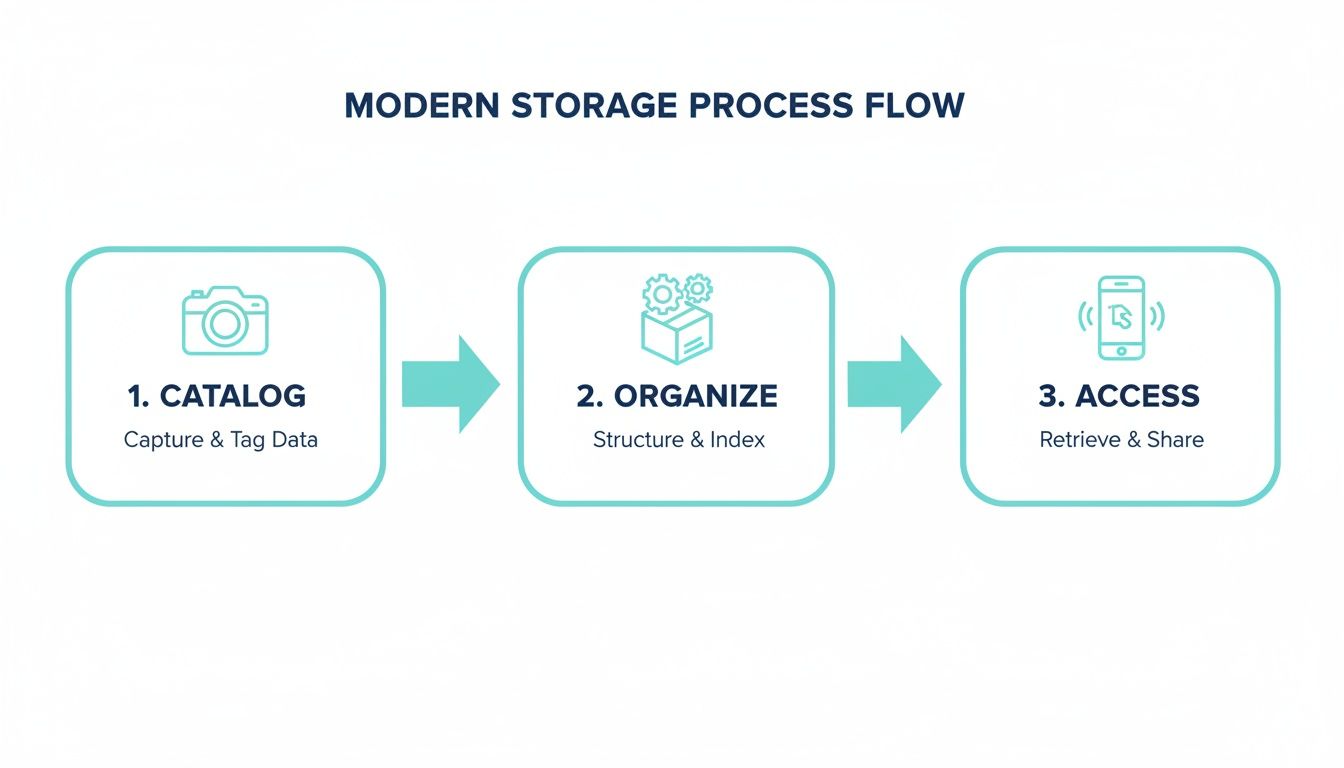
As you can see, it's a cycle. Smart digital cataloging and thoughtful physical placement work together, turning retrieval from a chore into a simple task.
Choosing the Right Size Unit
Guessing your unit size is one of the most common, and most expensive, mistakes people make. A unit that’s too small forces you to cram things in, creating dangerously overstuffed conditions. One that’s too big means you're literally paying for empty air every month. The fix? Assess your inventory before you even start calling facilities.
Start by listing your big-ticket items: furniture, appliances, and any oversized boxes. Then, for everything else, estimate how many standard-sized boxes you'll need. This simple math gives you a much clearer picture. For example, a standard 10x10 unit (100 square feet) can typically hold the contents of a one-bedroom apartment.
Taking 30 minutes to do a rough inventory can save you from months of paying for wasted space or the hassle of realizing you need a bigger unit halfway through your move. It's a small investment of time with a big financial payoff.
Mapping Your Storage Unit Layout
Once you know the size you need, it's time to sketch out a map. This doesn't have to be some architectural drawing; a quick diagram on a piece of paper or a tablet works perfectly. The real goal here is to create "zones" that make sense for how you'll actually use the space.
Your map should prioritize one thing above all else: a central aisle. Seriously, a clear walkway from the door to the back of the unit is non-negotiable. It transforms your unit from a static pile of stuff into a walkable library of your belongings, ensuring every single item is within reach.
With your aisle established, start zoning the layout. The easiest way to do this is to think about your items in terms of how often you'll need to access them.
- Front Zone (High-Frequency Access): This is for things you might need on a regular basis. Think kids' sports equipment, tools you use for weekend projects, or files you access quarterly.
- Middle Zone (Seasonal Access): Perfect for holiday decorations, off-season clothing, and camping gear. You only need to get to them a few times a year, so they don't need to be right by the door.
- Back Zone (Long-Term Storage): The very back of the unit is reserved for items you don’t expect to touch for a long time. This is the spot for family heirlooms, archival paperwork, or that dining set you're saving for a future home.
Factoring in Climate and Security
Your blueprint isn't just about where things go; it's also about keeping them safe. Two factors you can't overlook are climate control and security. Climate-controlled units maintain a steady temperature and humidity, which is absolutely essential for protecting sensitive items from damage.
You should strongly consider a climate-controlled unit if you're storing:
- Wooden Furniture: Prevents warping, cracking, and splitting from temperature swings.
- Electronics: Protects delicate internal circuitry from extreme heat, cold, and moisture.
- Artwork and Photographs: Guards against fading, mold, and paper degradation.
- Important Documents: Keeps paper from becoming brittle or collecting mildew.
Finally, do a quick assessment of the facility's security measures. Look for the basics like perimeter fencing, keypad gate access, and good lighting. For real peace of mind, on-site video surveillance is a must-have. A secure facility ensures your perfectly organized unit stays exactly as you left it.
Gathering the Right Supplies for Success
A great plan is half the battle, but equipping yourself with the right tools is the other. I've seen it a hundred times: people use flimsy, mismatched cardboard boxes or forget basic protection, and their well-organized unit quickly turns into a pile of damaged, dusty belongings. The right supplies don't just make packing easier; they protect your stuff for the long haul.
Think of your supplies as an investment in the longevity of your possessions. It's tempting to grab whatever's cheapest, but spending a little more on quality materials now can save you from costly replacements later. It’s the difference between a system that works and one that, quite literally, falls apart.
Beyond the Basic Cardboard Box
Look, cardboard boxes are fine for a quick move across town. For long-term storage? They’re a liability. They weaken over time, absorb moisture like a sponge, and can even attract pests. If you want a setup that lasts, you need to think beyond the basics.
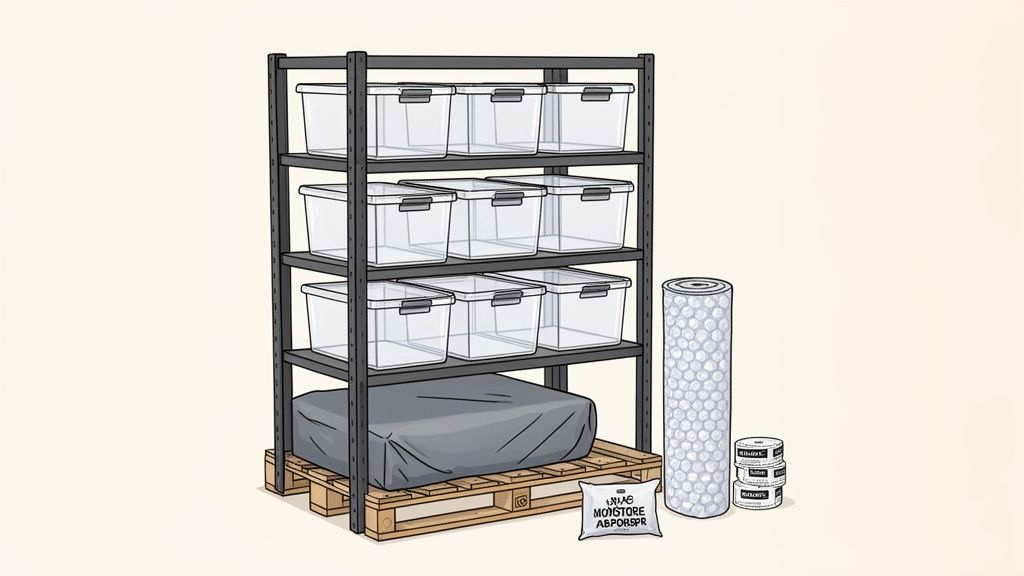
- Uniform Plastic Bins: Investing in sturdy, same-sized plastic bins is a total game-changer. They stack perfectly, creating stable walls that won't collapse under pressure. Clear bins are even better, since they let you see what's inside at a glance, saving you from the headache of opening ten containers just to find one thing.
- Freestanding Shelving Units: Never underestimate the power of vertical space. Sturdy metal or plastic shelving units can effectively double your storage capacity. More importantly, they get your bins off the floor, which improves air circulation and makes it infinitely easier to access items without unstacking everything.
- Wooden Pallets: Concrete floors are notorious for trapping moisture, which can seep into boxes and ruin their contents. Placing wooden pallets on the floor creates a crucial barrier, elevating your belongings and protecting them from potential water damage. It's a simple move with a huge payoff.
Choosing the right supplies is a strategic decision that directly impacts the safety and accessibility of your belongings. Uniform bins and shelving aren't just for organization; they are your first line of defense against damage.
Your Essential Supply Checklist
Before you pack a single item, make sure you have everything you need. A quick trip for these supplies will streamline your entire process and set you up for success from the very beginning.
Packing and Protection
- Sturdy, uniform-sized plastic bins (clear, if possible)
- High-quality packing tape and a dispenser
- Bubble wrap and packing paper for fragile items
- Furniture covers or old blankets to protect from dust and scratches
- Mattress bags to guard against moisture and pests
Organization and Structure
- Freestanding metal or plastic shelving units
- Wooden pallets to keep items off the floor
- A permanent marker or label maker
- Moisture absorbers (like silica gel packs) for non-climate-controlled units
This foundational toolkit ensures every item is packed securely and placed strategically. Poor organization is a massive time drain; frequent movers lose an average of 10 hours per relocation just hunting for misplaced items. Small hacks, like using pallets to elevate goods 6 inches off the floor, can slash moisture damage by 50% in units without climate control. You can learn more about these valuable self-storage trends and see how a well-equipped setup saves both time and money.
Smart Packing and Stacking Techniques
Alright, you’ve got your plan and your supplies. Now for the fun part: turning that pile of boxes into an organized, accessible system. This is where strategy meets action, and it’s about more than just cramming things in. Smart packing and stacking are about protecting your stuff, staying safe, and making sure you can find things later without a full-blown excavation.
Every decision you make now will directly impact how easy it is to grab that one box you need months, or even years, from now.
Building a Foundation The Right Way
Let’s start with a rule you can't ignore: heavy items always go on the bottom. This isn’t just a friendly tip; it’s basic physics. Get this wrong, and you’re looking at crushed boxes, damaged goods, and stacks that could topple over.
Think of your heaviest boxes, the ones filled with books, tools, or grandma's cast iron skillets, as the foundation. Place them directly on the floor (or better yet, on pallets) to create a solid, stable base. Lighter boxes with things like linens, clothes, or holiday decorations can then sit safely on top. Your back will thank you, too.
Mastering the Art of The Wall
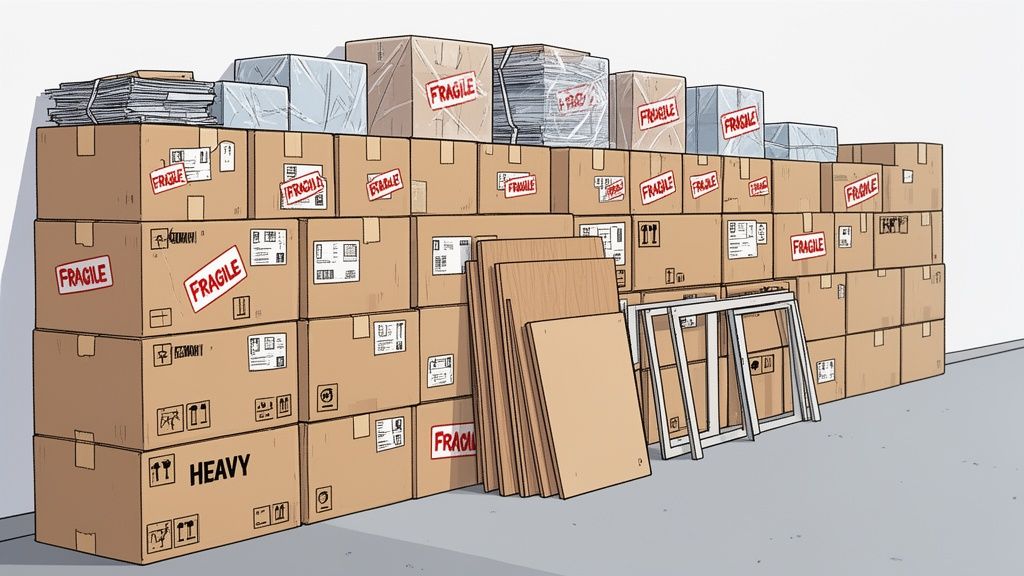
One of the best tricks I've learned is the "wall-building" technique. You stack uniform-sized boxes in tight, interlocking rows along the sides of your unit, just like a bricklayer. This creates surprisingly stable structures that support themselves and won't lean or fall.
Here’s how to do it right:
- Use same-sized boxes whenever you can. It makes a world of difference for stability.
- Alternate the orientation of the boxes in each layer, just like a brick pattern. This locks them together.
- Keep your center aisle clear as you build. Don’t lose that crucial walkway you planned.
This method is a game-changer for turning potential chaos into clean, accessible rows. For more ideas on using containers effectively, check out our guide on storage container organization ideas.
A well-built wall of boxes does more than just save space. It creates a visual catalog of your belongings, making it easier to scan labels and find what you need without dismantling an entire section.
Preparing Furniture and Fragile Items
Of course, not everything fits neatly into a standard box. Your bigger, bulkier, and more delicate items need some special prep work to make it through storage without a scratch.
For Large Furniture: Take apart everything you can. Table legs, bed frames, headboards, if it comes off, take it off. This drastically cuts down the space bulky items hog, freeing up a ton of floor space. Just be sure to keep all the screws and hardware in a labeled bag and tape it securely to the biggest piece of furniture it belongs to.
For Fragile Items: This part is non-negotiable: wrap everything properly. Use bubble wrap or packing paper to individually protect every glass, dish, and delicate collectible. When you pack them, stuff any empty space in the box with crumpled paper or packing peanuts to stop things from shifting around. And for goodness' sake, mark those boxes with "FRAGILE" on every single side.
The Power of Consistent Labeling
If you only remember one thing from this section, make it this: label everything, on every visible side. An unlabeled box is a mystery box, and a unit full of them is a recipe for a massive headache down the line.
Your labels need to be clear and detailed. Instead of just writing "Kitchen," be specific: "Kitchen: Blender, Coffee Maker, Silverware." Use a thick permanent marker or a label maker and stick labels on the top and at least two sides of each box. That way, you'll know what’s inside no matter how it's stacked.
The combination of good labeling and smart shelving is huge; it can reclaim 25-30% more usable space in your unit. Many are finding that digital tools take this even further. A surprising 49% of satisfied storers use digital aids for tracking. With modern inventory apps, you can search for things just by asking a question (like "Where's my antique vase?") and let features like image recognition and QR tags pinpoint the location instantly.
Creating a Searchable Digital Inventory
A physically organized unit is a great start, but let's be honest, it’s only half the battle. The real magic happens when you create a searchable digital inventory. This is your unit's "digital twin," a complete, browsable catalog of everything you own that lives right on your phone. It bridges the gap between your physical stuff and your ability to actually find it, turning a static storage space into your own personal, searchable library.
This process starts while you're packing. Instead of just taping up boxes and crossing your fingers, you catalog what goes into each one. It's a small step that feels like a bit of extra work now, but it completely eliminates the massive headache of trying to remember which box holds the good china three years down the road. And with modern tools, it's surprisingly fast.
Catalog Your Items Effortlessly
Forget about manually typing long lists into a clunky spreadsheet. These days, inventory apps let you use your phone's camera to do the heavy lifting. Powerful image recognition can often identify an object from a single photo, automatically pulling in details and categorizing it for you. This means you can log an entire box of kitchen gadgets in a fraction of the time it would take to write it all down by hand.
Another feature that's a total game-changer is receipt parsing. Let's say you buy new holiday decorations or some power tools that are heading straight into storage. Just forward the email receipt to your inventory app. It can automatically log the new purchases, capture details like the price and date, and add them to your digital catalog without you lifting a finger.
A digital inventory isn't just a list; it's a dynamic map of your belongings. It gives you the power to know exactly what you own and where it is at all times, turning a chaotic storage unit into a perfectly organized extension of your home.
From Physical Boxes to Digital Profiles
Once you've logged your items, the next step is linking them to their physical containers. This is where QR codes and NFC tags come in, and they are genuine lifesavers for anyone serious about organization. You can generate a unique QR code for each box right from an inventory app, print it on a sticker, and slap it on the box. Done.
Later, when you’re standing in your unit wondering where the camping gear is, you just scan a box's QR code with your phone. Instantly, a complete list of that box’s contents pops up on your screen. No more opening lid after lid, digging through layers of stuff just to realize you grabbed the wrong one. For an even slicker experience, NFC tags let you just tap your phone against a tag to see what’s inside. This kind of tech makes managing an off-site storage inventory remarkably efficient.
Here’s how it works in the real world:
- Assign Contents: As you pack a box, you add its items to a digital profile in your app. For example, "Box 14" now digitally contains your tent, sleeping bags, and portable stove.
- Generate and Apply a Tag: The app creates a unique QR code for "Box 14." You print this code and stick it on at least two sides of the physical box so it's always scannable.
- Scan for Instant Info: Months later, you can scan the code on "Box 14" and immediately confirm its contents before you even think about lifting it.
Find Anything with a Simple Question
The real power of a digital inventory shines when you need to find one specific thing but have no clue which of the 50 boxes it's in. This is where natural language search comes into play. Instead of scanning random boxes, you just open your app and type a question like you would in Google: "Where are my camping supplies?"
The system will instantly search your entire catalog and tell you exactly where to look. It might respond with, "Your camping supplies are in Box 14, located in the Middle Zone, Left Wall." This level of precision saves an incredible amount of time and physical effort. It turns a frustrating, potentially hours-long hunt into a 30-second query. You can even share access to your inventory with a spouse or family member, so anyone can find what they need without having to call you first.
Keeping Your System Dialed In Over Time
You’ve done the hard work. You’ve planned, packed, and created a storage unit that’s a model of efficiency. But let's be honest, great organization isn't a "set it and forget it" deal. It's a living system that needs a little attention to stay sharp.
Think of it like keeping a car tuned up. A few simple checks now and then prevent small issues from becoming major headaches down the road. This small investment of time ensures your unit doesn't slowly slide back into the chaos you worked so hard to escape.
Make Time for Seasonal or Annual Checkups
The secret to long-term success is a periodic visit. Whether you schedule it once a season or just once a year, carving out an hour to pop in can save you a world of trouble. A consistent schedule is what keeps things from getting out of hand.
This doesn't have to be an all-day affair. You're just doing a quick inspection to make sure your stuff is safe and your system is still working for you.
Here’s a quick-hit checklist for your routine visits:
- Inspect for Pests or Moisture: Do a quick walkthrough. Look for any signs of water damage, mildew, or critters. Check the corners, peek under pallets, and make sure your boxes are still solid.
- Confirm Your Aisle is Clear: That central walkway is your lifeline. Make sure boxes haven’t shifted or that new items haven’t started creeping into this critical path. Accessibility is everything.
- Test Your Digital Inventory: Grab a random box and scan its QR code with your phone. Does it pull up the right item list in Vorby? This quick test confirms your digital brain is still in sync with your physical one.
How to Add New Items Without Wrecking Your System
Life happens. You’ll inevitably need to add more things to your unit. The real test of your system is how easily it can absorb new items without falling apart. When you bring something new, fight the urge to just drop it in the first empty space you see. That's the beginning of the end.
Instead, take a moment to do it right. Place the new item in its proper category zone. More importantly, update your digital inventory on the spot. It takes less than 30 seconds to snap a photo, add it to Vorby, and assign it a location. That tiny habit is the glue that holds your entire organizational system together for the long haul.
A well-organized storage unit is a living system. Regular check-ins and thoughtful updates are what keep it from becoming a static, forgotten space. This ensures your initial investment of time continues to pay off.
And remember, protecting your belongings is just as crucial as organizing them. Taking the time to properly store clothes long term, for example, ensures they come out looking just as good as when they went in.
Your Top Storage Questions, Answered
Even the best-laid plans hit a snag. When you're knee-deep in boxes and tape, questions are bound to pop up. Here are some quick answers to the most common challenges people run into, designed to solve problems on the spot and keep you moving.
Plastic Bins or Cardboard Boxes?
Ah, the classic debate. While it's tempting to grab cheap cardboard boxes, uniform plastic bins are almost always the smarter long-term investment. They're built tougher, they stack like a dream, and they're your best defense against moisture, dust, and pests.
Think about it this way: cardboard boxes sag over time, soak up moisture from concrete floors, and can get crushed under the weight of everything else. If you're storing items for more than a few months, the durability of plastic is worth every penny. Plus, clear bins let you peek inside without having to tear everything open.
What's the Smartest Way to Store Furniture?
Proper furniture storage is a space-saving game-changer. The number one rule? Disassemble everything you possibly can. Take the legs off tables, break down bed frames, and remove headboards. Not only does this make each piece a breeze to move, but it lets you store them way more efficiently.
Always wrap furniture in moving blankets or old sheets to shield it from dust and scratches; avoid plastic wrap, which can trap moisture and ruin finishes. Pro tip: Store big, flat pieces like tabletops and mirrors standing up vertically along the walls. This frees up a massive amount of floor space. And for the love of all that is holy, tape a labeled baggie with all the screws and hardware directly to the piece of furniture it belongs to. You'll thank yourself later.
Always leave a central aisle wide enough to walk through. This one move transforms your unit from a Tetris-like pile of boxes into a browsable library of your belongings, making sure nothing is ever truly buried.
How Do I Actually Keep Track of Everything in There?
It’s shocking how quickly you can forget what’s even in your storage unit. A simple paper inventory list taped to the wall near the door is a decent start, but let's be honest, it’s not going to cut it when you need to find something specific six months from now.
A digital inventory is the only real way to know exactly what you have and precisely where it is. Using an app to create a searchable catalog isn't just a neat trick; it's the modern answer to an age-old headache. You can:
- Snap photos of items as you're packing them up.
- Link them to specific boxes using unique QR codes.
- Search for anything later right from your phone, like asking, "Where are the camping chairs?"
This approach turns a task that feels totally overwhelming into a simple, manageable system that actually works.
Ready to build a perfectly organized and searchable storage unit? Vorby gives you the tools to catalog your belongings with AI, map your space with QR codes, and find anything in seconds. Start your free trial today and take control of your clutter.